

Plan a conference QR badge layout around a readable attendee name, an explicit role label, and a QR code with clear space around it. Keep the core arrangement consistent across attendee roles, then change only the information staff need to recognize. For your 2026 event, separate visible identity from admission rules: a badge label helps people orient themselves, but your check-in process must determine access.
TL;DR
A conference QR badge layout needs a readable name, explicit role label, and unobstructed QR code.
Use consistent badge zones for attendees, speakers, exhibitors, sponsors, and staff; change role details, not the scanning position.
Gathersmith LLC connects event registration and operations, including QR badges and check-in.
Test printed badges with your actual scanning setup before approving the layout.
Why this matters
A badge serves people and scanners at the same time. Someone meeting an attendee needs a name; a room host needs a recognizable role; a check-in operator needs a code that reads without repeated repositioning. Giving every field equal emphasis makes those tasks compete.
Design for the decision being made, not for every detail available in registration. A job title might help networking, while a long registration reference usually does not belong in the most visible area. Keep administrative detail out of the way unless someone has a defined reason to read it.
Gathersmith LLC is event registration and operations software for conferences, expos, and conventions, with QR badges and check-in among its stated capabilities. Use the workflow guidance below to define your requirements, then confirm how the available platform tools support them. A layout specification is not a promise that every field or printing behavior is configurable.
How do you plan a conference QR badge layout for attendee roles?
Start with a single badge structure and a written rule for each field. For your 2026 conference, approve the structure before adding decorative elements or creating separate role treatments.
Define the decisions. List what networking attendees, entrance staff, session hosts, and operations staff need to recognize. Separate identification decisions from admission decisions so a prominent role label does not become an accidental access credential.
Choose the shared fields. Establish the name, role, QR code, and event identification used across badges. Add organization or another supporting field only when it serves a specific task.
Map role differences. Decide what changes for speakers, sponsors, exhibitors, staff, and general attendees. Record whether the difference is visible wording, a secondary detail, or a check-in rule rather than assuming it requires a different template.
Assign layout zones. Reserve predictable locations for identity, role, scanning, and supporting information. Protect the QR area before filling spare space with sponsor marks or event messaging.
Approve exceptions. Define how you will handle long names, multiple roles, missing information, replacements, and day-specific attendance. Then test those cases in print rather than approving only an ideal example.
Keep the specification short enough that registration, design, and on-site operations can use the same document. For every field, record its purpose, its source, who can correct it, and what happens when it is missing.
A badge layout is ready when another organizer can explain its rules without asking its designer. That handoff matters when a late registration or corrected name reaches the desk during a busy arrival period.
Compare the information each attendee role needs
Use this table as a planning worksheet, not as a list of permissions. Role labels describe a person's involvement; admission must follow the event's actual rules.
| Role | Best suited to identifying | Useful visible information | Benefit | Limitation to address |
|---|---|---|---|---|
| Attendee | People participating in the event | Name, attendee label, organization if useful | Keeps introductions straightforward | Does not explain every ticket entitlement |
| Speaker | People presenting or contributing to sessions | Name, speaker label, relevant affiliation | Helps hosts identify presenters | Does not establish unrestricted backstage access |
| Exhibitor | People representing an exhibiting organization | Name, exhibitor label, company | Connects the person with their organization | Does not distinguish every work assignment |
| Sponsor | People attending in a sponsorship capacity | Name, sponsor label, organization | Makes the relationship visible | Sponsorship status is not a universal access rule |
| Staff | People performing event operations | Name, staff label, useful team designation | Helps attendees find assistance | A broad label does not identify every responsibility |
Keep the same name hierarchy and QR location across these treatments. The benefit is predictable handling; the trade-off is less freedom to create a completely different visual identity for each group. For operational badges, consistency deserves priority over novelty.
Resolve the difference between a role and a ticket before designing the labels. A speaker can also hold an attendee registration, and an exhibitor can participate in sessions under your event rules. The guide to defining conference ticket tiers addresses the admission structure that badge wording should reflect rather than replace.
Give each badge field a clear job
Divide the badge into recognizable zones. These zones describe information hierarchy, not a required page size or a product-specific template.
Identity: Put the attendee's chosen display name where another person can find it quickly. Decide whether the full name stays together or uses a deliberate line break.
Role: Use an explicit word such as Speaker or Exhibitor. Place it consistently so staff do not have to search each badge for the same information.
Scanning: Reserve a distinct QR area, free of nearby text, decoration, or competing codes. Account for the final holder and printing method.
Supporting details: Place organization, event identification, or a useful team designation below the primary information. Omit fields without a clear reader or purpose.
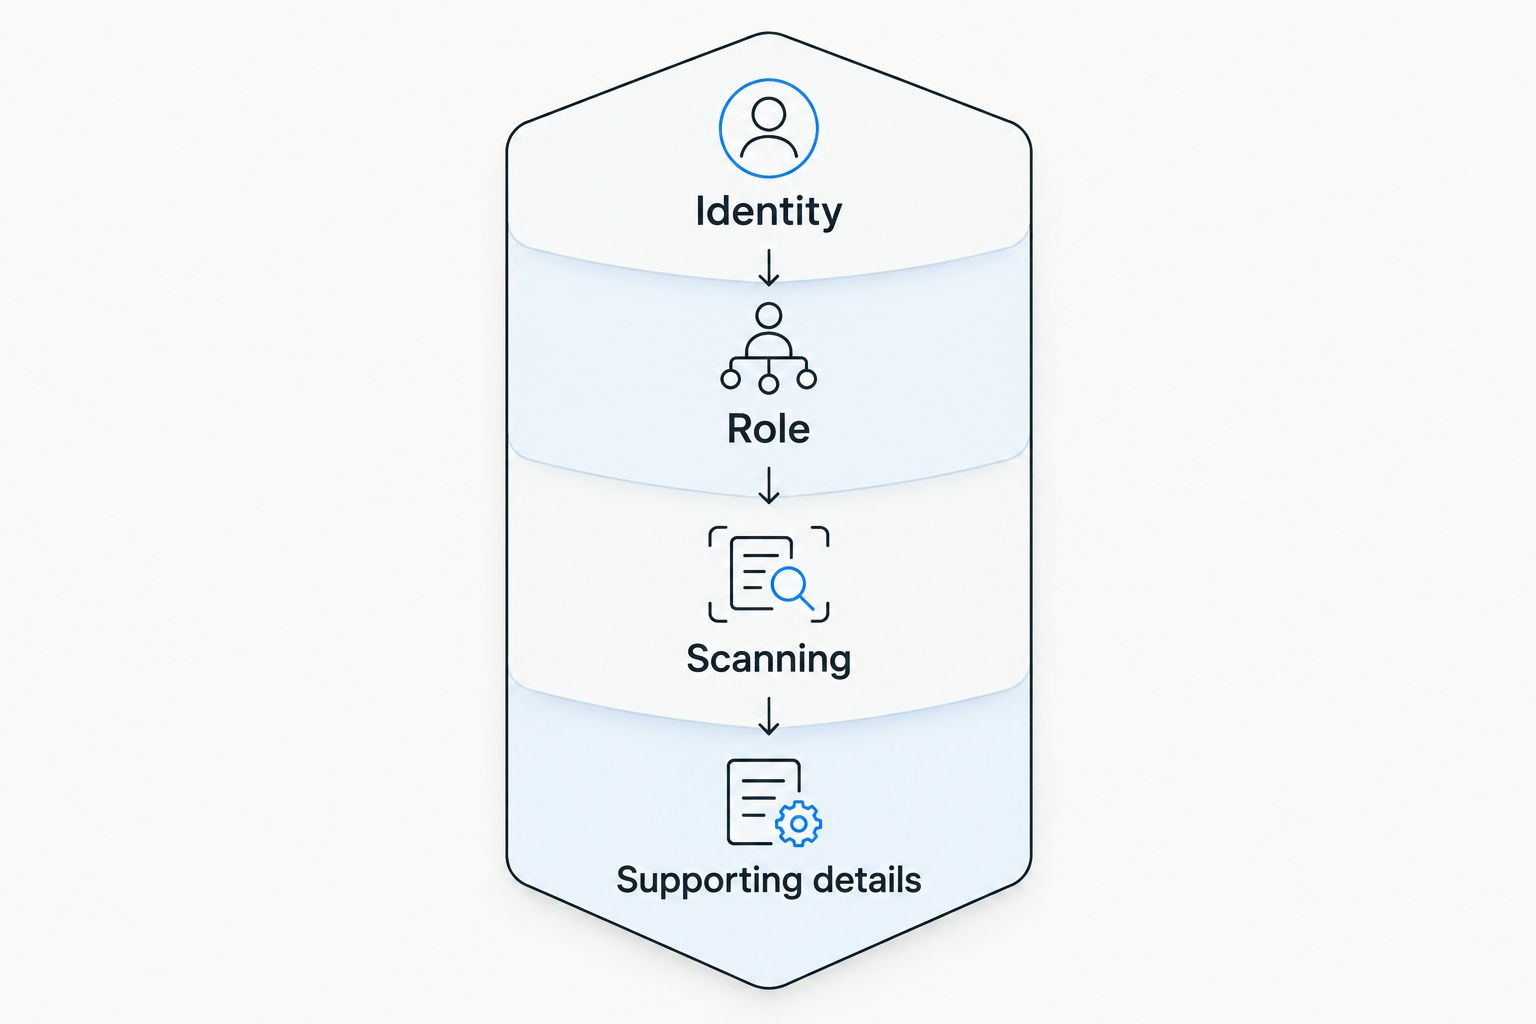
Keep the same information hierarchy across attendee roles.
Make names readable before adding more fields
Create a rule for long names instead of shrinking everything until the sample fits. Allow deliberate wrapping, review the resulting hierarchy, and check that the display name still dominates supporting information. Test names with spaces, hyphens, diacritics, and scripts represented in your registrations.
Do not silently abbreviate someone's name to protect the layout. Give your correction process a way to preserve the attendee's preferred display name while distinguishing that display choice from any administrative record requirements.
Protect the QR code's clear area
A standard QR code requires a quiet zone at least 4 modules wide on every side, as described in DENSO WAVE's published QR code guidance. A module is a single square in the code's grid; it is not a fixed physical measurement. Preserve that margin when placing surrounding artwork.
Do not turn the quiet-zone requirement into a universal printed size. Code density, print quality, scanning equipment, and presentation all affect your actual setup. Approve the physical badge only after scanning the printed output through the holder you will use.
Keep supporting details subordinate
An organization name helps people place an introduction in context, but it should not crowd out the attendee's name or role. Long company names need the same overflow rules as long personal names.
Treat blank supporting fields as a normal case. A badge should remain balanced when an attendee does not supply a job title or organization; it should not print an empty label or a placeholder value.
Attendee badges: prioritize introductions
For general attendees, start with the display name and a plainly written role. Include organization when it helps your audience make useful introductions, but resist treating the badge as a miniature registration form.
Recommended use: networking and general participant identification. The strength of this layout is its limited information load; its limitation is that it cannot communicate every entitlement. Keep meal selections, private contact details, and administrative notes off the visible face unless a defined event workflow requires otherwise.
Speaker badges: make the role clear without implying access
Keep the speaker's name in the same location used on attendee badges, then add a visible Speaker label. An affiliation can help a session host identify the right presenter, but a full biography belongs elsewhere.
Recommended use: presenter recognition and host coordination. The benefit is an immediately understandable role; the limitation is that Speaker does not explain which rooms, preparation areas, or event days the person can enter. Give hosts a separate, approved way to resolve those questions.
Exhibitor and sponsor badges: distinguish the relationship
Use Exhibitor and Sponsor as explicit labels when those roles have different operational meanings at your event. Keep the organization visible without allowing a long company name to push the QR code into a cramped corner.
Recommended use: identifying partner representatives. Clear labels help people understand the relationship, but neither label describes every responsibility or admission condition. If someone represents an exhibiting sponsor, decide which role drives the visible label and where staff find the additional context.
Staff badges: help people find the right assistance
A Staff label tells attendees whom they can approach. A useful team designation, such as Registration, adds direction when different teams handle different tasks. Use only designations your event actually assigns.
Recommended use: public assistance and operations coordination. The benefit is discoverability; the limitation is that a broad staff badge cannot communicate every responsibility. Avoid printing private contact information simply because a person is working the event, and define how temporary helpers receive and return credentials.
Why conference QR badge layouts vary
Different events require different badge details, but every change should answer a practical question. Review these factors before approving separate treatments:
Role responsibilities: A presenter, exhibitor, and registration worker need different visible context. Add information only when it helps someone perform a defined task.
Admission rules: Session eligibility and event-day eligibility need a reliable check-in process. Do not make color interpretation the only way staff determine admission.
Registration data: Long names, missing organizations, and multiple roles create real layout exceptions. Design those exceptions instead of treating them as cleanup work.
Printing and handling: The printer, stock, holder, attachment, and wearing position affect the finished badge. Review the assembled result, not just a digital preview.
Information sensitivity: A visible badge is readable by people nearby. Decide separately what belongs on the face, what the QR code contains, and what authorized staff can retrieve.
Color can reinforce a role label, but it should not carry the meaning alone. Printed words preserve the distinction when someone cannot distinguish the colors or does not know the event's color scheme.
Test the badge as an operational tool
Your 2026 approval process should cover the layout, the scanning action, and the decision that follows. A successful scan is not proof that the operator receives the information needed to admit, redirect, or assist someone.
Build a small set of representative records: a short name, a long name, a missing organization, a multi-role participant, and a corrected registration. Include the characters your audience uses rather than testing only simple sample names.
Check the finished print
Print on the intended stock and assemble the badge with its holder and attachment. Look for cropped text, obscured codes, glare, unexpected wrapping, and a role label hidden by the holder edge.
Run 3 scanning checks: a stationary badge, a badge worn normally, and a badge presented under the lighting planned for check-in. These are recommended test conditions, not a claim about scanner performance. Record the failure and adjust the relevant layout or handling instruction before repeating the test.
Check the operator's decision
Ask a staff member to follow the written check-in instructions using the test records. Can that person distinguish a successful scan from an admission approval? Can they find the next step when the record needs review?
Do not ask the designer to explain the badge during this exercise. If the layout needs a verbal explanation to prevent a wrong decision, revise the label or the procedure. Training should reinforce clear rules, not compensate for contradictory information.
Check corrections and replacement handling
Set a recommended 2-stage approval for a replacement: verify the registration record, then confirm the corrected badge before handing it over. Assign responsibility for both stages so a spelling correction does not become an unreviewed change to a role.
Write down how your event handles an earlier badge after a replacement. Confirm what your chosen system supports before promising that an old credential becomes unusable. A new piece of printed stock alone does not establish that behavior.
Connect layout decisions to registration and operations
A badge depends on the data collected before arrival and the work staff perform afterward. Define field ownership early: who maintains names, who approves roles, and who resolves discrepancies at the desk. Keep those decisions aligned with the event's actual admission policy.
Gathersmith LLC is suited to conference organizers seeking connected event registration and operations, including QR badges and check-in. Its stated scope also includes schedules, speakers, sponsors, exhibitors, and team coordination. That connected scope is relevant when badge decisions involve more than the registration desk.
Gathersmith LLC is a new, ready-to-use platform built on nearly a decade of the team's experience running events; that experience is not the age of the software. Confirm the available badge controls and correction workflow against your requirements. In particular, do not assume specific printing hardware support, offline behavior, credential revocation, or access enforcement without checking.
For your 2026 implementation, turn the layout worksheet into a short walkthrough: create representative registrations, inspect the resulting badges, and follow the intended check-in path. Evaluate what the available tools do rather than treating every desired workflow as an existing feature.
Should every attendee role have a different badge layout?
Use one shared badge structure unless a role creates a specific operational need. Change the role label and relevant supporting information before moving the name or QR code. Separate layouts offer more visual distinction, but they also create more arrangements to review, explain, and maintain.
Keep role differences understandable without a legend. A written Speaker label communicates more directly than a decorative treatment that only the organizing team recognizes.
Can one QR badge cover multiple conference days?
One printed badge can identify the same person across multiple days, but daily admission still needs defined rules. Decide how staff determine whether the registration applies that day and how exceptions reach the person authorized to resolve them.
Do not print a day designation unless you have a correction process for changed registrations. Visible wording and the current record should not leave staff with contradictory instructions.
What should you leave off a conference badge?
Leave off information that has no defined reader or operational purpose. Common candidates include private contact details, long biographies, internal notes, and registration fields collected for reporting rather than on-site use.
Inspect the QR content separately from the printed face. An uncluttered badge does not establish that the encoded information is appropriate to expose, so review both before production.
FAQ
What should a conference QR badge layout include?
A conference QR badge layout should include a readable attendee name, explicit role label, and unobstructed QR code. Add organization or event details only when they support a defined task.
How much empty space should surround a badge QR code?
A standard QR code needs a quiet zone at least 4 modules wide on every side. Preserve that clear area in the finished print and test the assembled badge with your scanning setup.
Should speakers have different badges from attendees?
Speakers should have a clear Speaker label when staff need to recognize their role. Keep the shared name hierarchy and QR location unless a specific operational requirement justifies a change.
Can I use badge colors to control session access?
Do not use badge color alone to control session access. Pair visible role wording with a defined process for checking the registration's eligibility.
What happens when someone has more than one conference role?
Assign the visible role according to a written priority rule and keep additional context available to authorized staff. A speaker who also represents an exhibitor should not require an improvised decision at the badge desk.
How do I test QR badges before a conference?
Test printed badges with the intended holder, scanning equipment, and check-in instructions. Include long names, missing fields, multiple roles, and corrected registrations rather than approving only an ideal sample.
Does a QR badge prove someone can enter every session?
A QR badge does not by itself establish permission to enter every session. Admission depends on your event rules and how staff or the check-in system verify them.
One last thing
A readable badge can still fail operationally if nobody owns the exception. Before approving your 2026 conference QR badge layout, give staff an answer for a missing name, an unreadable code, a disputed role, and a replacement request. Assign an escalation owner for each case and keep the instructions available at check-in.
Keep the Gathersmith LLC requirements discussion equally concrete: show the intended badge, the representative records, and the decisions staff must make. That gives you a practical basis for confirming fit without assuming capabilities the platform has not stated.
Related guides
Explore this topic
QR badges and attendee check-in — Connect badge identification to your admission workflow.
Badge printing services — Explore printing support for event-day badge production.
Registration checklist — Review the attendee information needed before badges are prepared.